Building Asterisk
For this primer, we will build Asterisk on top of a base Ubuntu 12 Server install. Most Linux distributions should more or less work exactly the same way, but things like package names and versions might differ slightly so you'll just have to adapt yourself.
Why not just use an Asterisk package?
You certainly can, but don't be afraid to build from the source! Since a lot of distros like to change the software's default install paths, for the purposes of this primer we're going to build from the source with all the default paths as a consistent frame of reference. If you decide to use a package instead, you just might not find things where I say they are and will have to adapt accordingly.
Install the package prerequestites
In order to build Asterisk you need a few additional pieces of software installed. At minimum we need a compiler, some build tools, and a few development libraries Asterisk needs. Using Aptitude or apt-get or whatever package manager you like, you need to install:
- gcc
- g++
- make
- libncurses-dev
- libxml2-dev
- libsqlite3-dev
- libssl-dev
- uuid-dev
Several other packages will also get selected and installed as dependencies.
Download and unpack the Asterisk source
First, fetch the Asterisk source tarball from asterisk.org - we are going to use the 'current' latest version which, at the time of this writing, is Asterisk 11.5.1.
You can download to and build from wherever you want. I tend to like /usr/local/src but your user home directory works just as well.
tar -xzf asterisk-11-current.tar.gz
In this case the current version of Asterisk 11 happened to be 11.5.1, so it un-tarred into a directory called "asterisk-11.5.1" - Note that this may or may not be the version you got, so adjust accordingly.
Configure the Asterisk build
We'll do this in two steps. First we need to let the build script analyize our compiler environment and generate some config files necessary to do the build:
./configure
The configure script will go through and look for various headers and development libraries and determine what capabilities it is able to build into Asterisk. If things go well it should spit out a giant ASCII-art Asterisk logo, at which point we can make the 'menuconfig' target to further configure how Asterisk will be built:
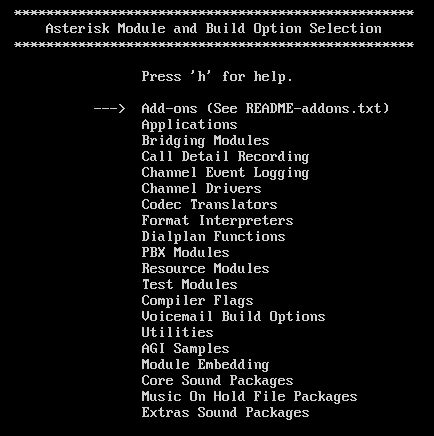
You should wind up on a screen like this:

Yours may look different.
If you wind up with some other blue/purple and red graphical menu, you probably had libnewt-dev previously installed on your system. Don't panic, the instructions below still generally apply, but things just look a bit different. You'll figure it out.Asterisk is highly modularized; almost every feature is compiled into a separate shared library which can be dynamically loaded at runtime, rather than statically compiled into the core. Many modules have additional dependencies on other 3rd-party development libraries, but all of the basics we'll be needing for now should already be included, so we'll ignore almost everything in the menuconfig. One thing we will change are the sound sets to install.
By default Asterisk will install only the GSM sound set, GSM being a low-bandwidth codec that sounds of crap - so let's put in something a bit better.
Using the cursor keys, scroll down to Core Sound Packages and cursor right. Scroll down to CORE-SOUNDS-EN-ULAW and press enter to select it. You can also (but don't have to) de-select the GSM sounds if you want.
For fun, let's also install the Extras sound set. Press the left cursor key to go back out to the main menu, and scroll down to the Extras Sound Pacakges and cursor right. Scroll down to the EXTRA-SOUNDS-EN-ULAW and hit enter to select them.
Now that we've made our selections, hit the left cursor key to return back to the main menu, and then press s to save the configuration and exit out of menuconfig. (libnewt users can cursor right to the 'Save & Exit' button or press F12.)
Build & install Asterisk
Now we're ready to compile and install! First, we build:
Assuming things go well, you should eventually see a message stating "Asterisk has successfully been built, and can be installed..." so let's do that, as the root user:
make install
If you weren't doing all this as root before, you'll be asked for your user password. Once the install is complete, install the sample configs and init scripts that will launch Asterisk when the system boots:
make config
That's it -- now let's start configuring! Continue on to Getting Started.